Defeating a Heavily Obfuscated Keygenme Binary

Introduction
These days, many commercial products employ various protections to prevent reverse engineers from tampering with their intellectual property, making our job more challenging.
This morning, I discovered a very cool obfuscator called obfus.h, which was just published two months ago. I thought it would be interesting to tackle it and write an article!
The program I’ll be analyzing in this article is DosX’s Obfuscation of C (7 kb crackme). According to its description, this program is packed by UPX, which has been mutated using a tool called UPX-Patcher and obfuscated with the aforementioned obfuscator. Surprisingly, all these tools are made by the same author as the keygenme. They’re impressive, and you should definitely check them out!
Even though the obfuscator is open-source software, I thought it would be boring to just peek at its code and take advantage of it, so I haven’t looked at it.
Spoiler alert!: The key verification logic in this program is actually straightforward when viewed in a debugger. However, I believe the author intended this to be a fun challenge with obfuscation, so I won’t take the easiest route by simply tracing back from the final cmp instruction. Instead, mess around with the obfuscation on purpose in this blog post! lol
Table of Contents
- The program
- [+] Unpack it first
- [+] Static analysis and locate obfuscation technique
- [+] Planning
- [+] Taking down obfuscated jmps
- [+] Reconstruct grieved subroutines
- [+] Removing pointless function calling
- [+] Take a look at keygen logic
- Conclusion
The program
The program of the challenge is a simple keygenme. A Prompt “password »>” shows up upon run. It print out “[-] wrong password!” when u type in random string.
[+] Unpack it first
Right off the bat, let’s check if it’s actually packed. So the image below is the string list at executable’s Entrypoint. NOTHING shows up. This is enough to confirm that it’s indeed completely packed.
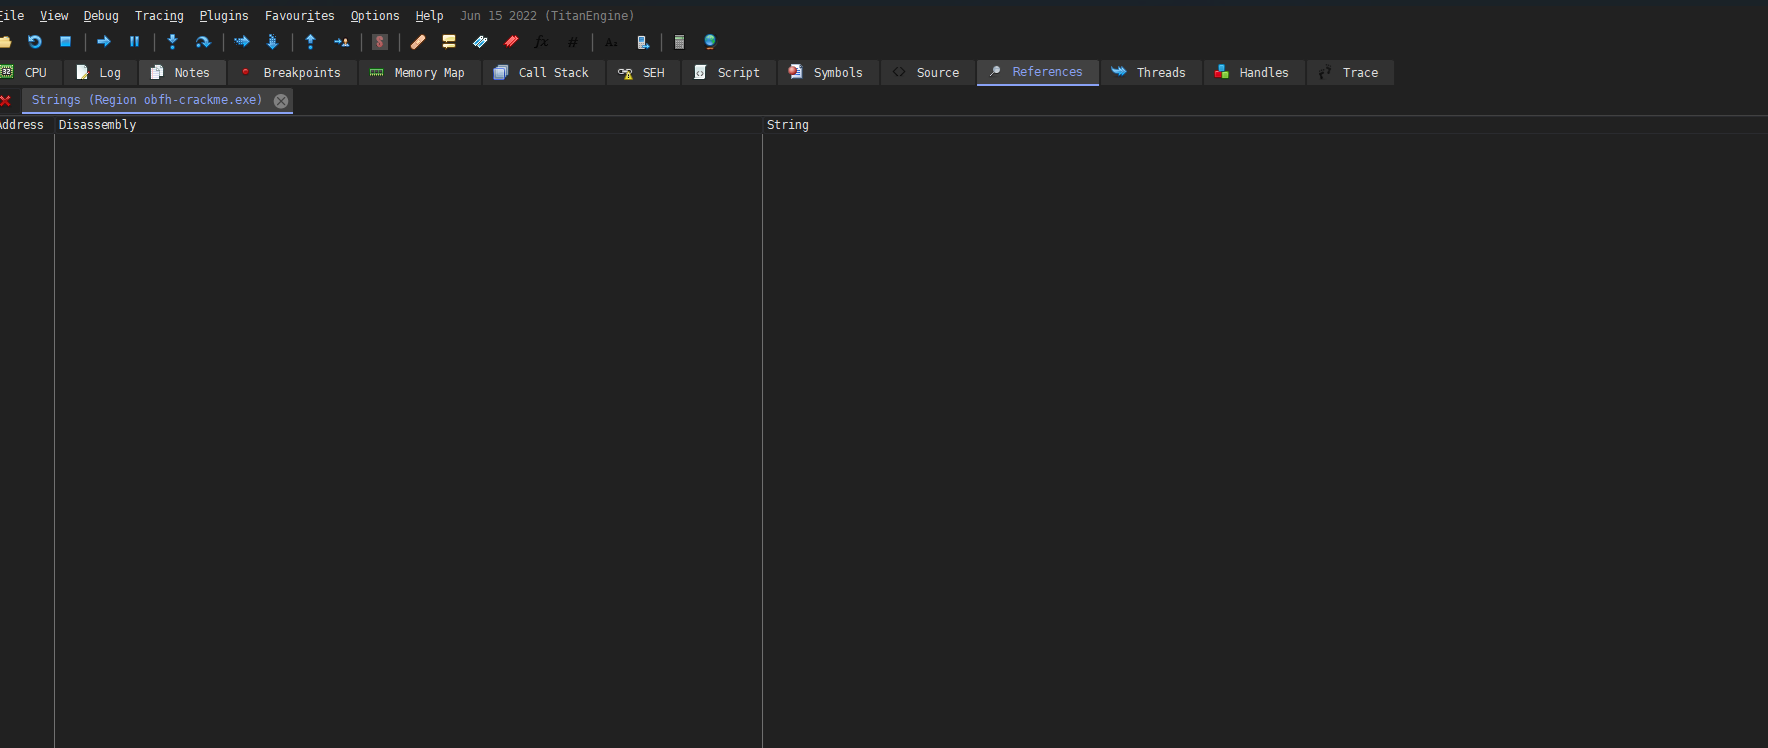 strings view in debugger
Thanks to the challenges description, I already know it’s packed by UPX. The patcher of UPX was well made and it prevents analysis tools from recognizing UPX. But after a quick browsing on its stub, the overall unpacking process was not likely modified…well I believe.
Also once I looked at the sections, the binary has suspicious section called ‘.dosx’ which has 0 raw-size but 118784 bytes of virtual size which indicates something will place data into it at runtime. If you have ever done UPX unpacking, you know… Yes, it’s most likely what original UPX would do. By that time I was assuming .dosx is the section that will store payload once unpacked(a.k.a UPX0), and the .fish is the one which is storing the packed payload(a.k.a UPX1), you can also confirm it from the remarkably high entropy .fish section has.
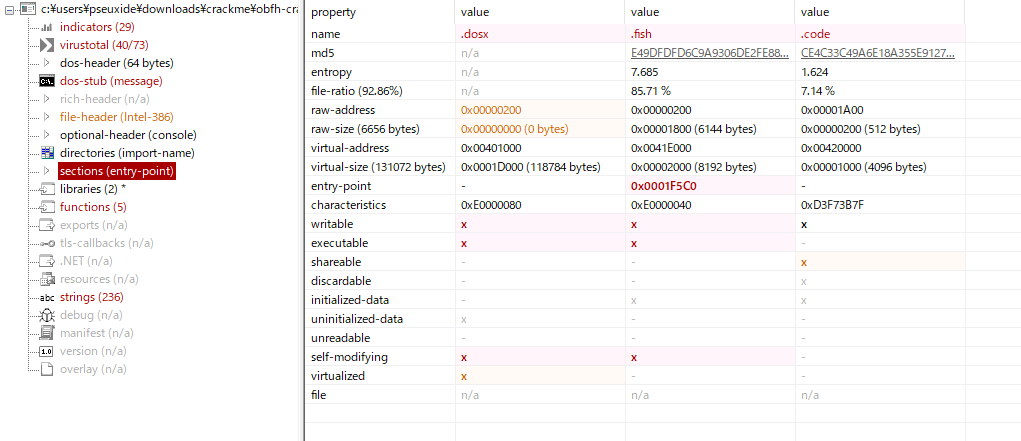 sections information
Anyways the stub will write payload into .dosx at some point and eventually the code in the section will be kicked. In that case u can set memory right of .dosx section to read-write so that whenever the stub try to execute the memory page exception will occurr, and by that timing the payload would have been written to the section. Only thing to do at last is to dump using Scylla.
After I set memory right, I successfully caught an exception at payload execution.
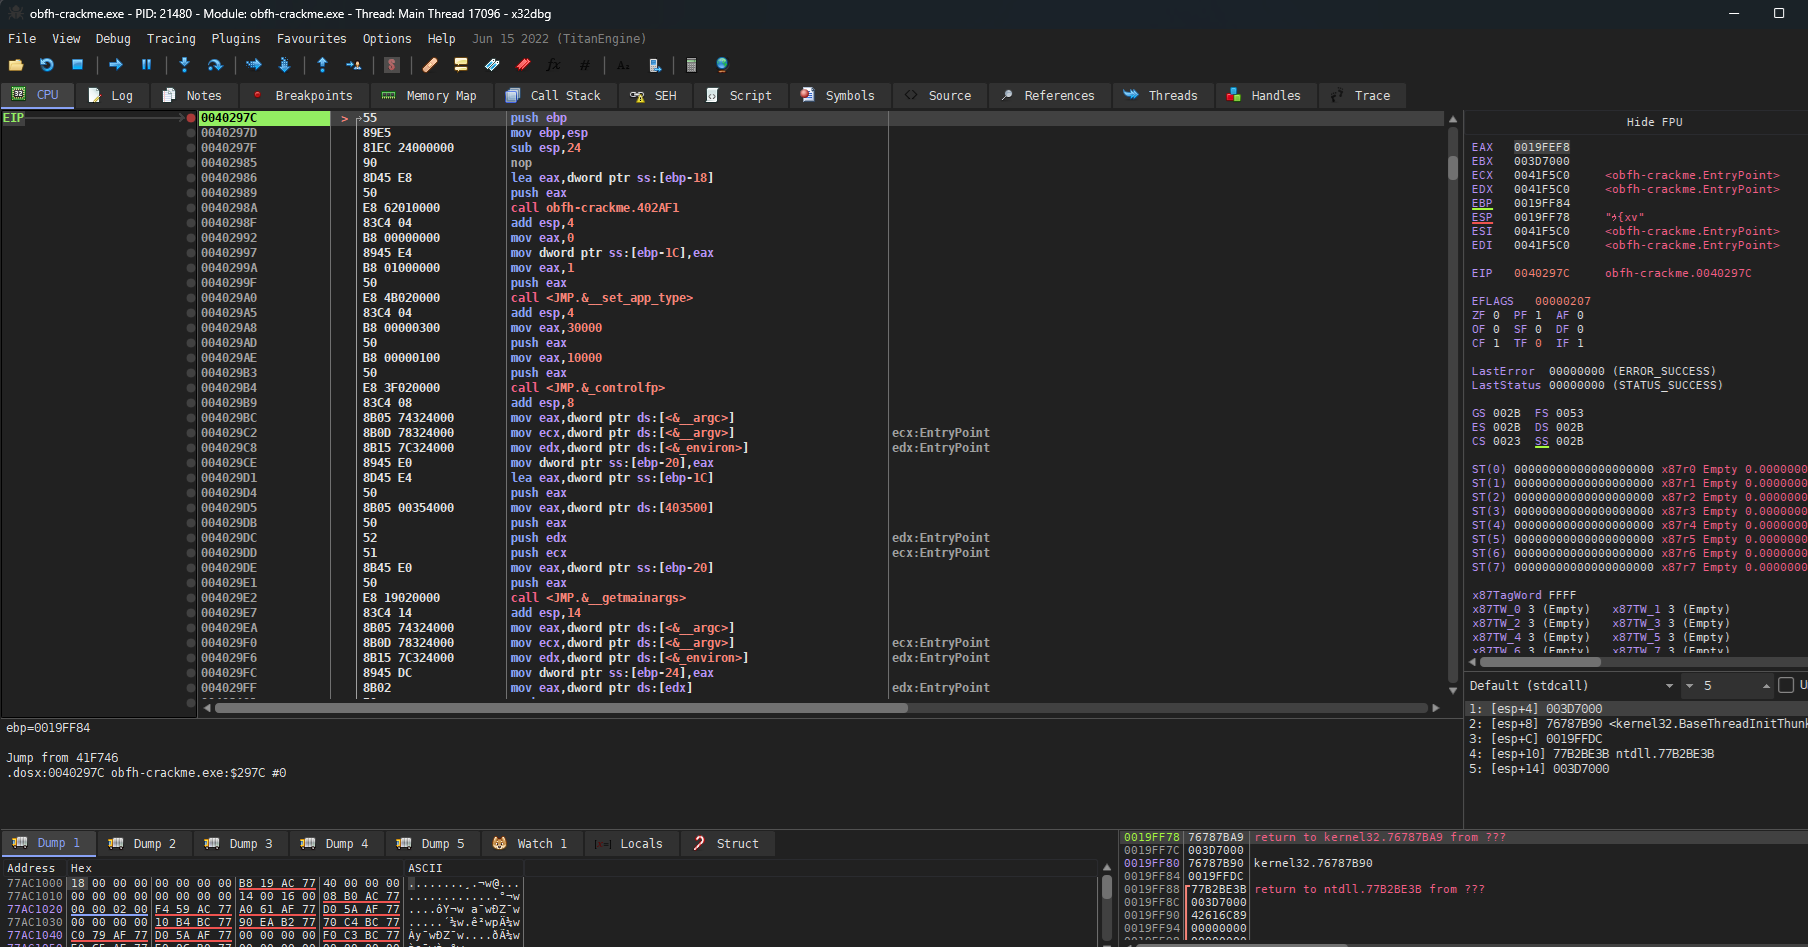 entry point of payload
As you can see, all the string has been restored!
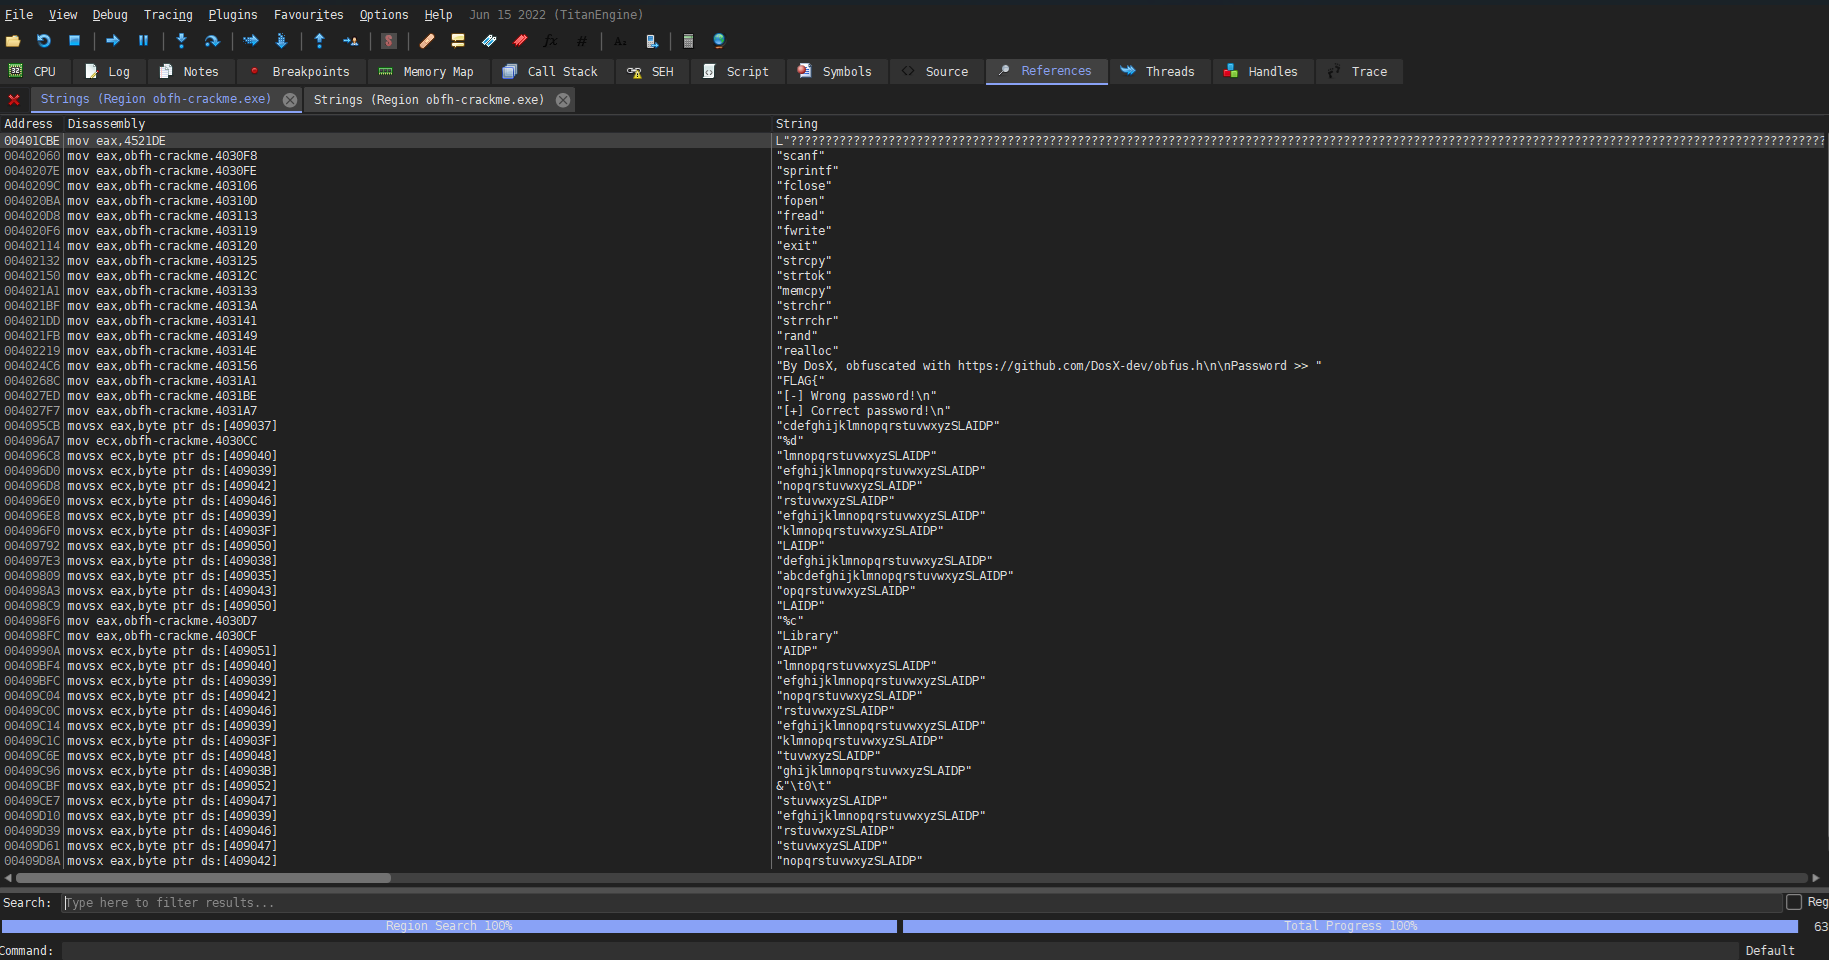 string view after unpack
Once I reached here dumping was as easy as snapping finger. Because Scylla automatically searches IAT and does relocation and unmapping, the resulting dump file is runnable by itself.
 dumping payload using Scylla
[+] Static analysis and locate obfuscation technique
We’ve restored all the raw payload, so let’s move on to static analysis, fired up IDA and loaded up the dump.
The image below is a part of the disassembly. I can say that every part of the code was similar to this which was bizzare. Let me explain why.
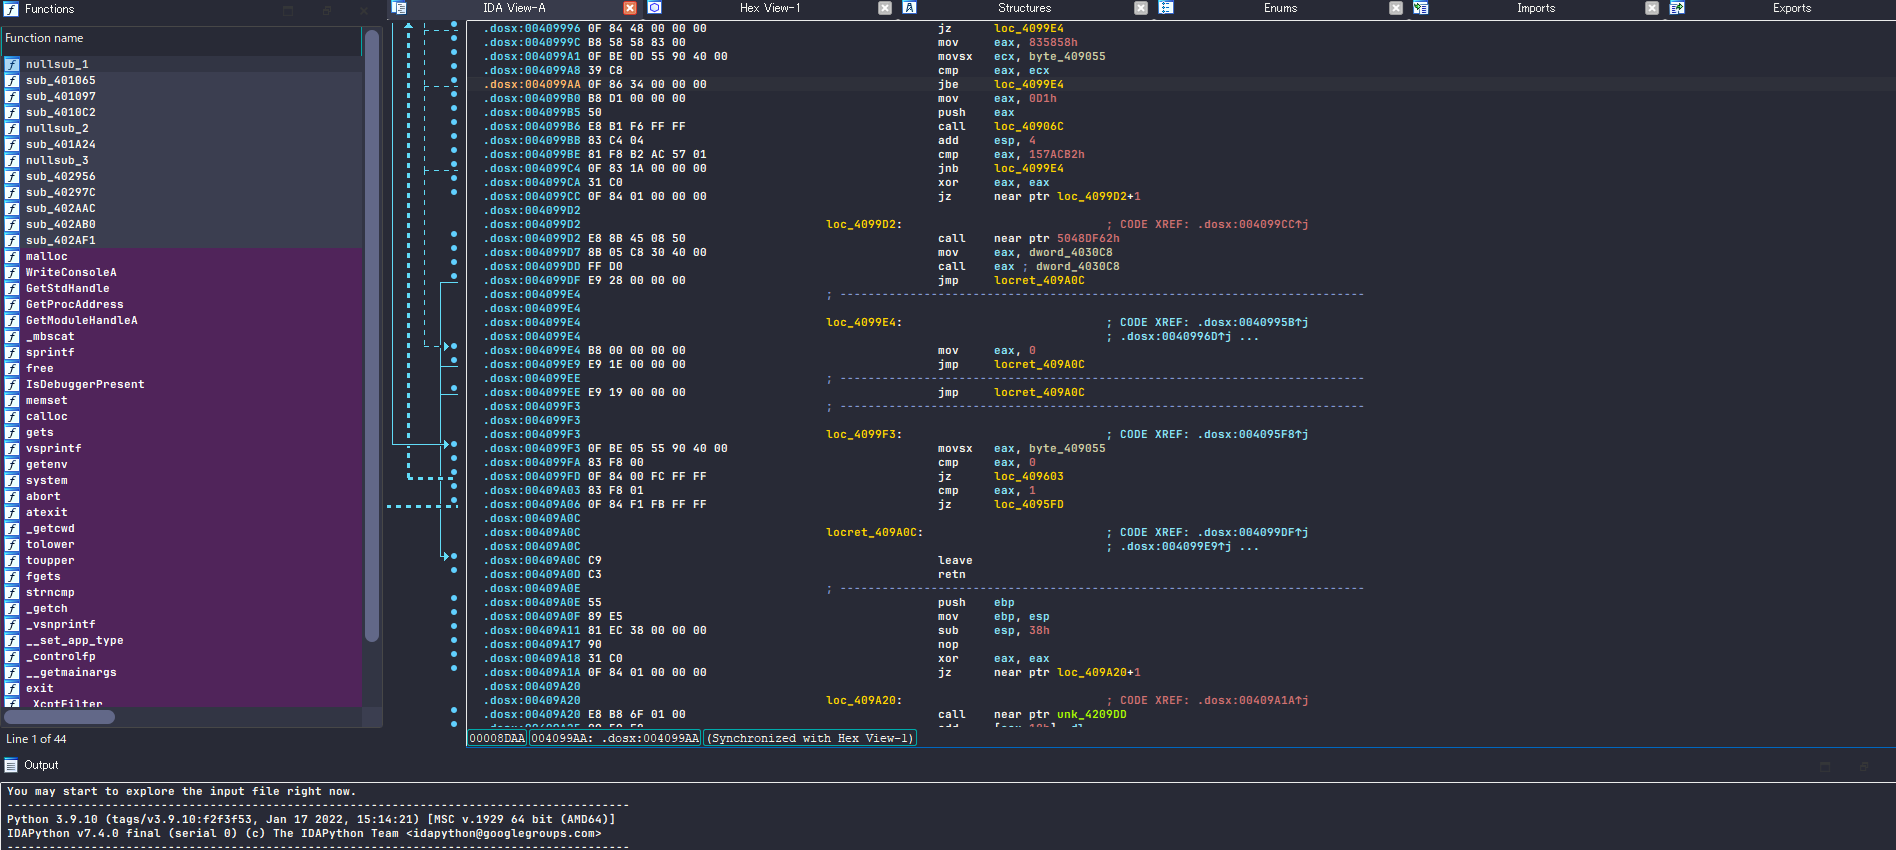 what it looked like initially
When I look around the disassembly a bit, I immediately noticed a few weird points in the code.
Firstly, there are fewer subroutines than expected, and the section is instead filled with a large chunk of contiguous code. Additionally, while there are not many subroutine invocations, there are numerous local address references. As a result, I couldn’t view it in either graph mode or pseudocode. This was a major inconvenience for reverse engineering, so I had to find a solution.
Secondly I see bunch of jmp instruction which has +1 at the end meaning the obfuscator is somehow making IDA misinterprete the instruction. I must’ve fixed this otherwise I cannot see the legetimate instruction behind the jump. (at 0x4099CC in image above)
Thirdly quite a few conditions of conditional-jmp instruction seems won’t change on execution which leads the jmp instructions pointless. However because jmp is overused the control flow has became very messy to follow. It’s a known obfuscation technique called Opaque Predicates.
Lastly there’re some instructions and even subroutines that doesn’t do meaningful thing. Which offen refers to as Junk code insertion
At this point I sensed that this is gonna be a tough night lol.
[+] Planning
Since I couldn’t straight away converting code into subroutines, I had to go around and deal with obfuscations one by one.
The impulsory measure to take first is fixing the +1 jmp obfuscation. otherwise me and also hex-lays decompiler wouldn’t understand what it’s actually doing. Usually when you can recognize the pattern of instructions around the obfuscation, IDA’s powerful scripting feature IDApython comes into very handy.
Next, I see the stray bytes in middle of the code which also stopping IDA from making a subroutine. Not sure at this point but I anyway decided to nop out the bytes for now so that I can make code to subroutines. I used IDApython for this too.
In terms of junk code insertion I only removed the junk subroutine calls for cleaning purpose.
So I ended up with not dealing with opaque predicates and dead store because even if It screw up the control flow I felt like the disassembly and pseudocode was readable. In my view, at the very least, the junk code included
abuse of the cpuid instructionanddouble assignment to registers before use. I assume I can clean them up with symbolic execution or optimization but it’s gonna be too much for this keygenme.
[+] Taking down obfuscated jmps
Because I haven’t seen this, I couldn’t tell whether the jmp is broken or the instruction the jmp tries to jump to is broken. In my opinion It’s okey to mess around and investigate to verify what seems correct cuz every action can be Ctrl+z.
After a bit of research, the latter idea of my assumptions seems to be correct. Take a look at the image below. The jz is jumping to near ptr loc_4099D2+1. Therefore, undefining 0x4099D2 and make code back again from 0x4099D3 makes very much sense!
 LEFT: obfuscated, RIGHT: deobfuscated
At this point, I thought it was fairly safe to nop out the isolated bytes at 0x4099D2 and convert them to code as well. I assumed it was unlikely to be referenced by other subroutines unless dynamically resolved, since the byte didn’t have a cross-reference annotation. I figured, ‘If I find any suspicious subroutine dynamically resolving and referencing the byte, I can always fix it later.’
So the image below is the final result of deobfuscated jmp looks like. It’s absolutely clean isn’t it.
 final result
I cant afford time of fixing tons of jumps manually, I decided to leverage the power of IDAPython to automatically detect and patch them all.
Here’s the code. I dont go into too deep about code here instead I put good amount of comments for readers.
1
2
3
4
5
6
7
8
9
10
11
12
13
14
15
16
17
18
19
20
21
22
23
24
25
26
27
28
29
30
31
32
33
34
35
36
37
38
39
40
41
42
43
44
45
46
47
48
49
50
51
52
53
54
55
56
57
58
59
60
61
62
63
64
65
66
67
import idc
import idaapi
import idautils

# checking if mnemonic at ea is jmp or conditional jmp
def is_jmp_insn(ea):
    insn = idaapi.insn_t()
    if not idaapi.decode_insn(insn, ea):
        return False
    return insn.itype in [
        idaapi.NN_ja, idaapi.NN_jae, idaapi.NN_jb, idaapi.NN_jbe, idaapi.NN_jc,
        idaapi.NN_je, idaapi.NN_jg, idaapi.NN_jge, idaapi.NN_jl, idaapi.NN_jle,
        idaapi.NN_jna, idaapi.NN_jnae, idaapi.NN_jnb, idaapi.NN_jnbe, idaapi.NN_jnc,
        idaapi.NN_jne, idaapi.NN_jng, idaapi.NN_jnge, idaapi.NN_jnl, idaapi.NN_jnle,
        idaapi.NN_jno, idaapi.NN_jnp, idaapi.NN_jns, idaapi.NN_jnz, idaapi.NN_jo,
        idaapi.NN_jp, idaapi.NN_jpe, idaapi.NN_jpo, idaapi.NN_js, idaapi.NN_jz,
        idaapi.NN_jmp
    ]

# jmp instruction has +1 at the end
def is_jmp_with_plus_one(ea):
    disasm = idc.GetDisasm(ea)
    return "+1" in disasm

# patch bytes to nop (byte representation is 0x90)
def patch_nop(ea):
    idc.patch_byte(ea, 0x90)

# main deobfuscate function.
def deob_mid_jmp(start_ea, end_ea):
    # holds address already fixed to avoid double run at same address
    fixed_targets = set()

    ea = start_ea

    while ea < end_ea:
        if is_jmp_insn(ea):
            # getting jump destination's address
            target = idc.get_operand_value(ea, 0)
            # destination is not invalid address? jump has +1?  destination hasn't been fixed yet?
            if target != idc.BADADDR and is_jmp_with_plus_one(ea) and target not in fixed_targets:
                # undefine the destination-1 with DELIT_EXPAND flag. -1 cancels out +1
                idc.del_items(target - 1, idaapi.DELIT_EXPAND)
                # you need this to refresh internal ida database info
                idaapi.auto_wait()
                # sometimes undefining doesnt done correctly so do it again
                if not idc.GetDisasm(target - 1).startswith("db "):
                    idc.del_items(target - 1, idaapi.DELIT_EXPAND)
                    idaapi.auto_wait()

                # patching isolated byte
                patch_nop(target - 1)

                # converting undefined bytes into code
                if idc.create_insn(target - 1):
                    fixed_targets.add(target)
                else:
                    print(f"Failed to create instruction at {hex(target)}")
        ea = idc.next_head(ea, end_ea)

# .dosx sections are scattered around so u have to iterate over all segments and apply to all .dosx
for seg in idautils.Segments():
    seg_name = idc.get_segm_name(seg)
    if seg_name and seg_name == ".dosx":
        seg_start = idc.get_segm_start(seg)
        seg_end = idc.get_segm_end(seg)
        deob_mid_jmp(seg_start, seg_end)
After running this script all the jmps are correctly fixed and cleaned up. Now let’s deobfuscate even further!
[+] Reconstruct grieved subroutines
So when I look around the disassembly I’ve found a lot of place which looks like a function prologue. But somehow IDA didn’t get to mark it as a subroutine.
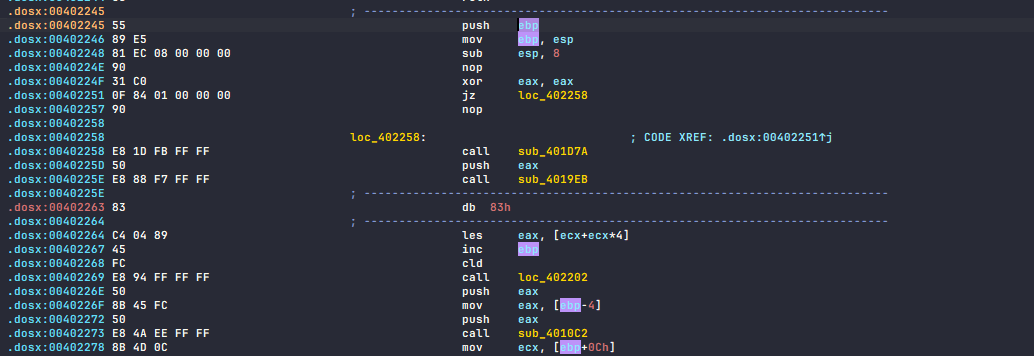 the stack setup looks promising to me
One message showed up when I pressed p on prologue.
.dosx:00402263: The function has undefined instruction/data at the specified address.
That’s right, the stray bytes are in the middle of the instruction I’m sure this is also to annoy reversers.
 isolated bytes are inserted like this
After nopping out every stray byts in the subroutine-looking code and then I successfully made a subroutine. At this point I was able to view in graph mode and pseudocode view! The thing is… it’s ridiculously ginormous lol. I realized how the control flow obfuscation is disgusting.
 I was like what the hell??
Anyway I automated this process too using IDApython. Here’s the code.
I had to make sure I won’t mess up the big chunk of bytes in
.dosxsection which is stored and referenced from other code. so I meticulously pick up the bytes up to 4 in middle of the code. 4 is just a cap I set based on its pattern.
1
2
3
4
5
6
7
8
9
10
11
12
13
14
15
16
17
18
19
20
21
22
23
24
25
26
27
28
29
30
31
32
33
34
35
36
37
38
39
40
41
42
43
44
45
46
47
48
49
50
import idc
import idautils

def patch_nop(ea):
    idc.patch_byte(ea, 0x90)

def find_and_nop_dbs(start_ea, end_ea):
    db_start_ea = 0 # hold start address of db sequence
    ea = start_ea
    while ea < end_ea:
        if idc.GetDisasm(ea).startswith('db'):
            db_start_ea = ea
            count = 0
            db_start = ea
            # loop until it goes out of db group or count reaches 5
            while ea < end_ea and idc.GetDisasm(ea).startswith('db') and count < 5:
                count += 1
                ea += 1
            # count is lte 4?  db group is surrounded by non-db and non-dd instructions?
            if count <= 4 and not idc.GetDisasm(db_start_ea - 1).startswith('db') and not idc.GetDisasm(db_start_ea - 1).startswith('dd') and not idc.GetDisasm(ea + 1).startswith('dd'): # making sure it's not a part of a string or stored data that will be used
                for addr in range(db_start, ea):
                    patch_nop(addr)
            else:
                ea = db_start + 1
        else:
            ea += 1

def convert_to_subroutine(start_ea, end_ea):
    find_and_nop_dbs(start_ea, end_ea)
    ea = start_ea
    while ea < end_ea:
        # looking for prologue
        if (idc.print_insn_mnem(ea) == "push" and idc.print_operand(ea, 0) == "ebp" and
            idc.print_insn_mnem(idc.next_head(ea, end_ea)) == "mov" and
            idc.print_operand(idc.next_head(ea, end_ea), 0) == "ebp" and
            idc.print_operand(idc.next_head(ea, end_ea), 1) == "esp" and
            idc.print_insn_mnem(idc.next_head(idc.next_head(ea, end_ea), end_ea)) == "sub" and
            idc.print_operand(idc.next_head(idc.next_head(ea, end_ea), end_ea), 0) == "esp"):
            # convert to subroutine at the head of prologue
            idc.add_func(ea)
            ea = idc.next_head(idc.next_head(idc.next_head(ea, end_ea), end_ea), end_ea)
        else:
            ea = idc.next_head(ea, end_ea)

for seg in idautils.Segments():
    seg_name = idc.get_segm_name(seg)
    if seg_name and seg_name == ".dosx":
        seg_start = idc.get_segm_start(seg)
        seg_end = idc.get_segm_end(seg)
        convert_to_subroutine(seg_start, seg_end)
[+] Removing pointless function calling
Lastly since I spotted some pointless subroutines such as the image below, I wrote its removal code. Funny enough, not only its contents are only nops, this particular subroutine doesn’t even setting up the stack lol.
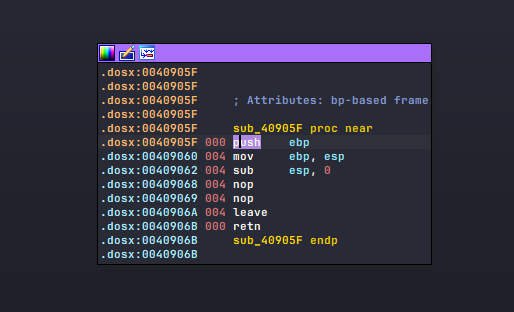 junk subroutine that does nothing
It was fairly easy to find a commodity of the invocation code.
- Pushing a value onto the stack (0x0040910F)
- Calling subroutine (0x00409110)
- Smashing the stack (0x00409115)
 how an invocation of garbage subroutine looks like
Because the calling conventions of the subroutines are __cdecl, the stack cleanup is caller’s responsibility. It’s piece of cake to nullify the subroutine when u dont have to care about stack corruption XD.
Just nop out the all bytes calling the subroutine!
I was too lazy to make it the best code. I hardcoded the function’s effective address and simply searching them up.
1
2
3
4
5
6
7
8
9
10
11
12
13
14
15
16
17
18
19
20
21
22
23
24
25
26
27
28
29
import idc
import idautils

# Your IDA base has to be rebased to 0x00400000
junk_function_list = [0x0040905F, 0x00401044, 0x0040906C]

def check_call_to_junk_function(ea):
    if idc.print_insn_mnem(ea) == "call":
        call_target = idc.get_operand_value(ea, 0)
        return call_target in junk_function_list
    return False

def patch_nop(ea, length):
    for i in range(length):
        idc.patch_byte(ea + i, 0x90)

def remove_junk_subroutine_call(start_ea, end_ea):
    ea = start_ea
    while ea < end_ea:
        if check_call_to_junk_function(ea):
            patch_nop(ea, 5)
        ea = idc.next_head(ea, end_ea)

for seg in idautils.Segments():
    seg_name = idc.get_segm_name(seg)
    if seg_name and seg_name == ".dosx":
        seg_start = idc.get_segm_start(seg)
        seg_end = idc.get_segm_end(seg)
        remove_junk_subroutine_call(seg_start, seg_end)
[+] Take a look at keygen logic
Now least deobfuscation has been done. I can see graph view and pseudocode of main components now so it’s a great timing to have a look at actual keygen logic.
Of course I reached for strings first. Recognizing where it’s used helps me so much on where to reverse engineer. Fortunatelly correct and wrong password message was found and this is where it’s used.
Most likely the password verification process starts around here. Because the subroutine is so huge because of the obfuscation I pressed F5 and tryna get hint from pseudocode.
The pseudocode looked like this without any analysis. I immediately noticed that there’s something wrong with the code, for example user input buffer is hidden in the pseudocode, technically it’s represented by 0x20 in the code which actually is an offset from ebp but not making much sense in the code. However, other than that it’s not hard to get an idea of what it’s doing.
 main logic pseudocode before analyzed
The main factors that slow down your analysis are unnecessary conditions and byte offsets that are only read and never written to.
Due to the opaque predicates, there are many if statements that always lead to the same result. Additionally, there are numerous byte_xxx values that turn out to be always the same. When I checked their references, they were always read-only, indicating they retain their original values from the disk.
For example this is the length subroutine I spotted but it’s not 100% straightforward. The condition at line 17 and 18 is the only valid check and others are just garbage. This subroutine basically take the pointer of the user input and go through 1 by 1 and return when it hits zero terminator \0.
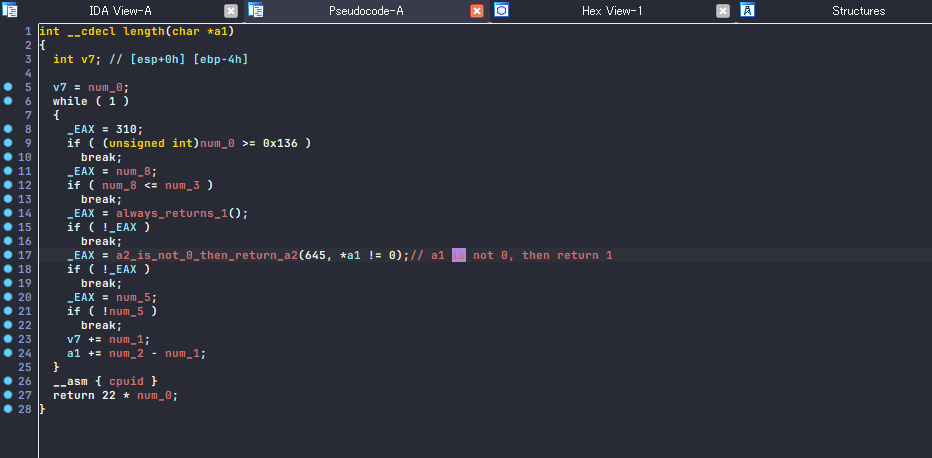 length subroutine
After a bit of static analysis and debugging using x32dbg I got to make the verification function slightly clearer.
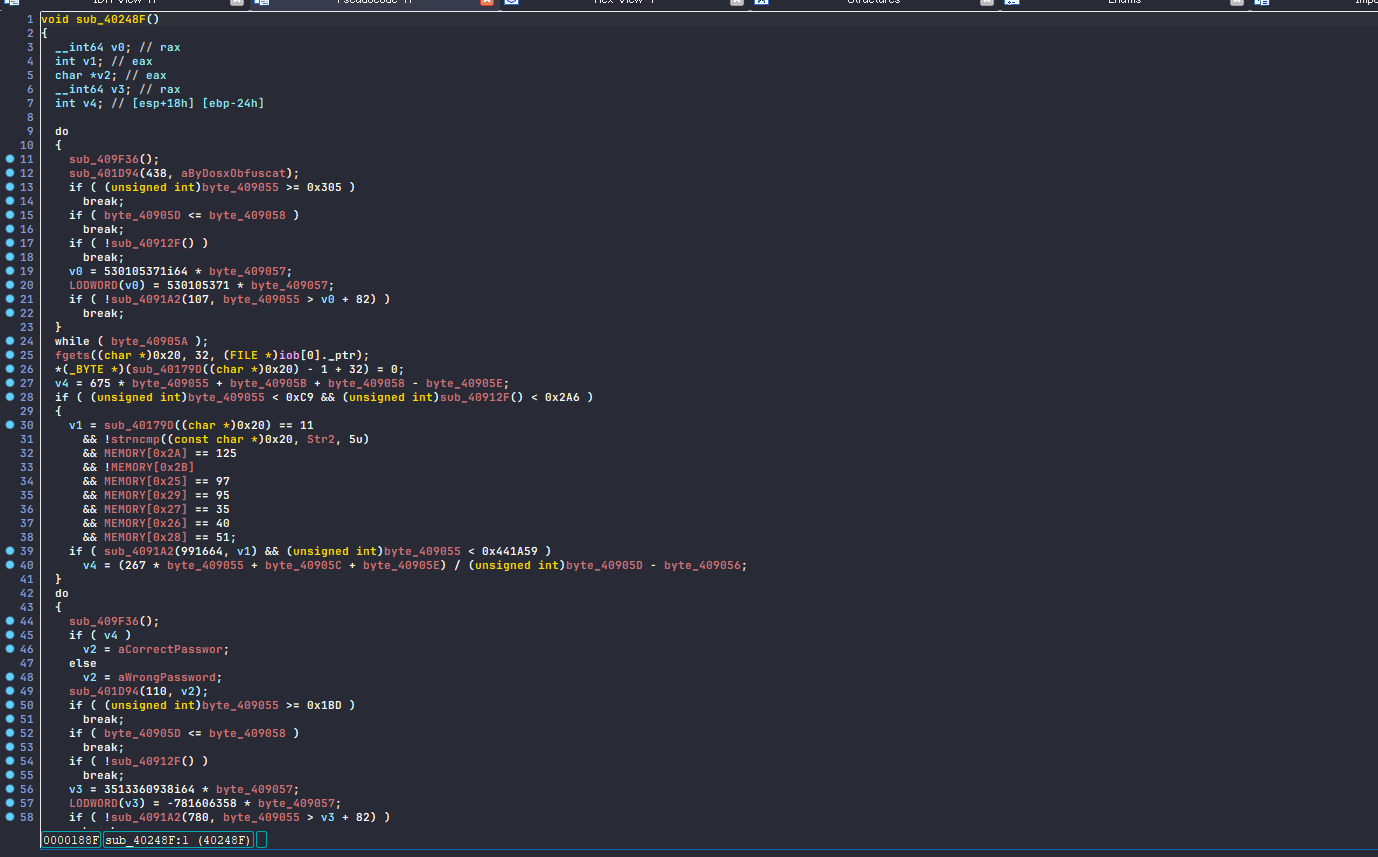
Now that we know at line 28 it’s initializing variable final_value then if the condition at line 40 is met, the final_value once again populated with 1. At line 40, the subroutine named a2_is_not_0_then_return_a2 is taking v4 as a2 parameter so v4 matters most here. If we get to make v4 == 1, then the condition will be met and final_value will be 1 which leads to “correct password!” at last! v4 is the boolean as you can see so i have to met the boolean to be true and at this point I know the huge MEMORY[] things are the verification.
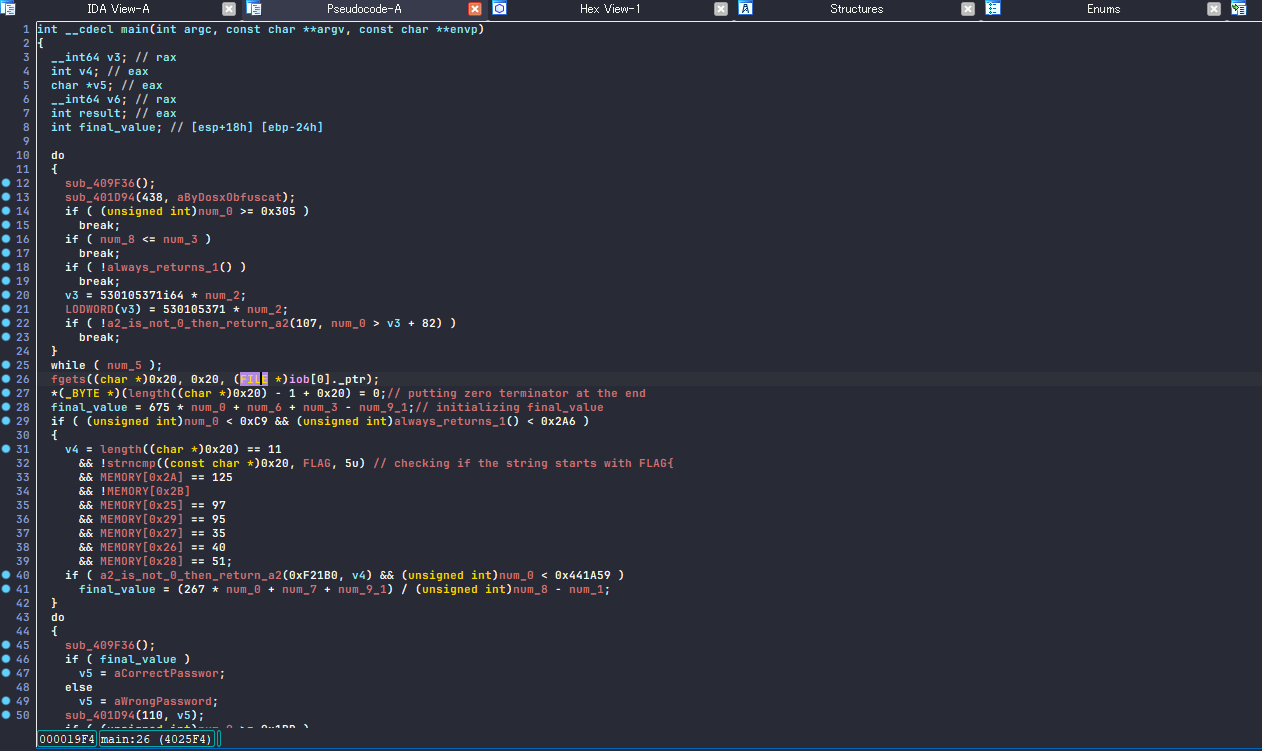 analyzed main logic pseudocode
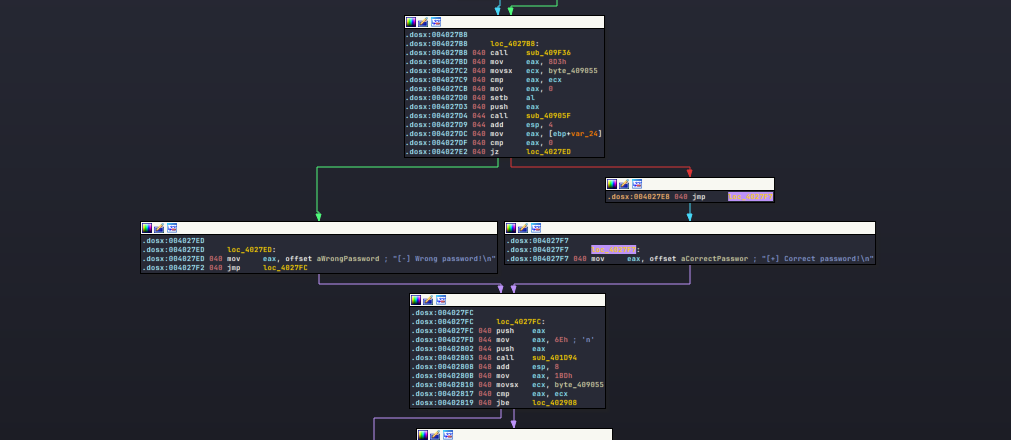
Since the buffer representation is screwed up in pseudocode, I decided to read disassembly from now. The disassembly was not heavily obfuscated so I should be fine locating the logic without utilizing any advanced scripts. Indeed, it didnt take me much time to find verification process. I already done commenting and renaming, yet the image below is the correspoinding part determining v4.
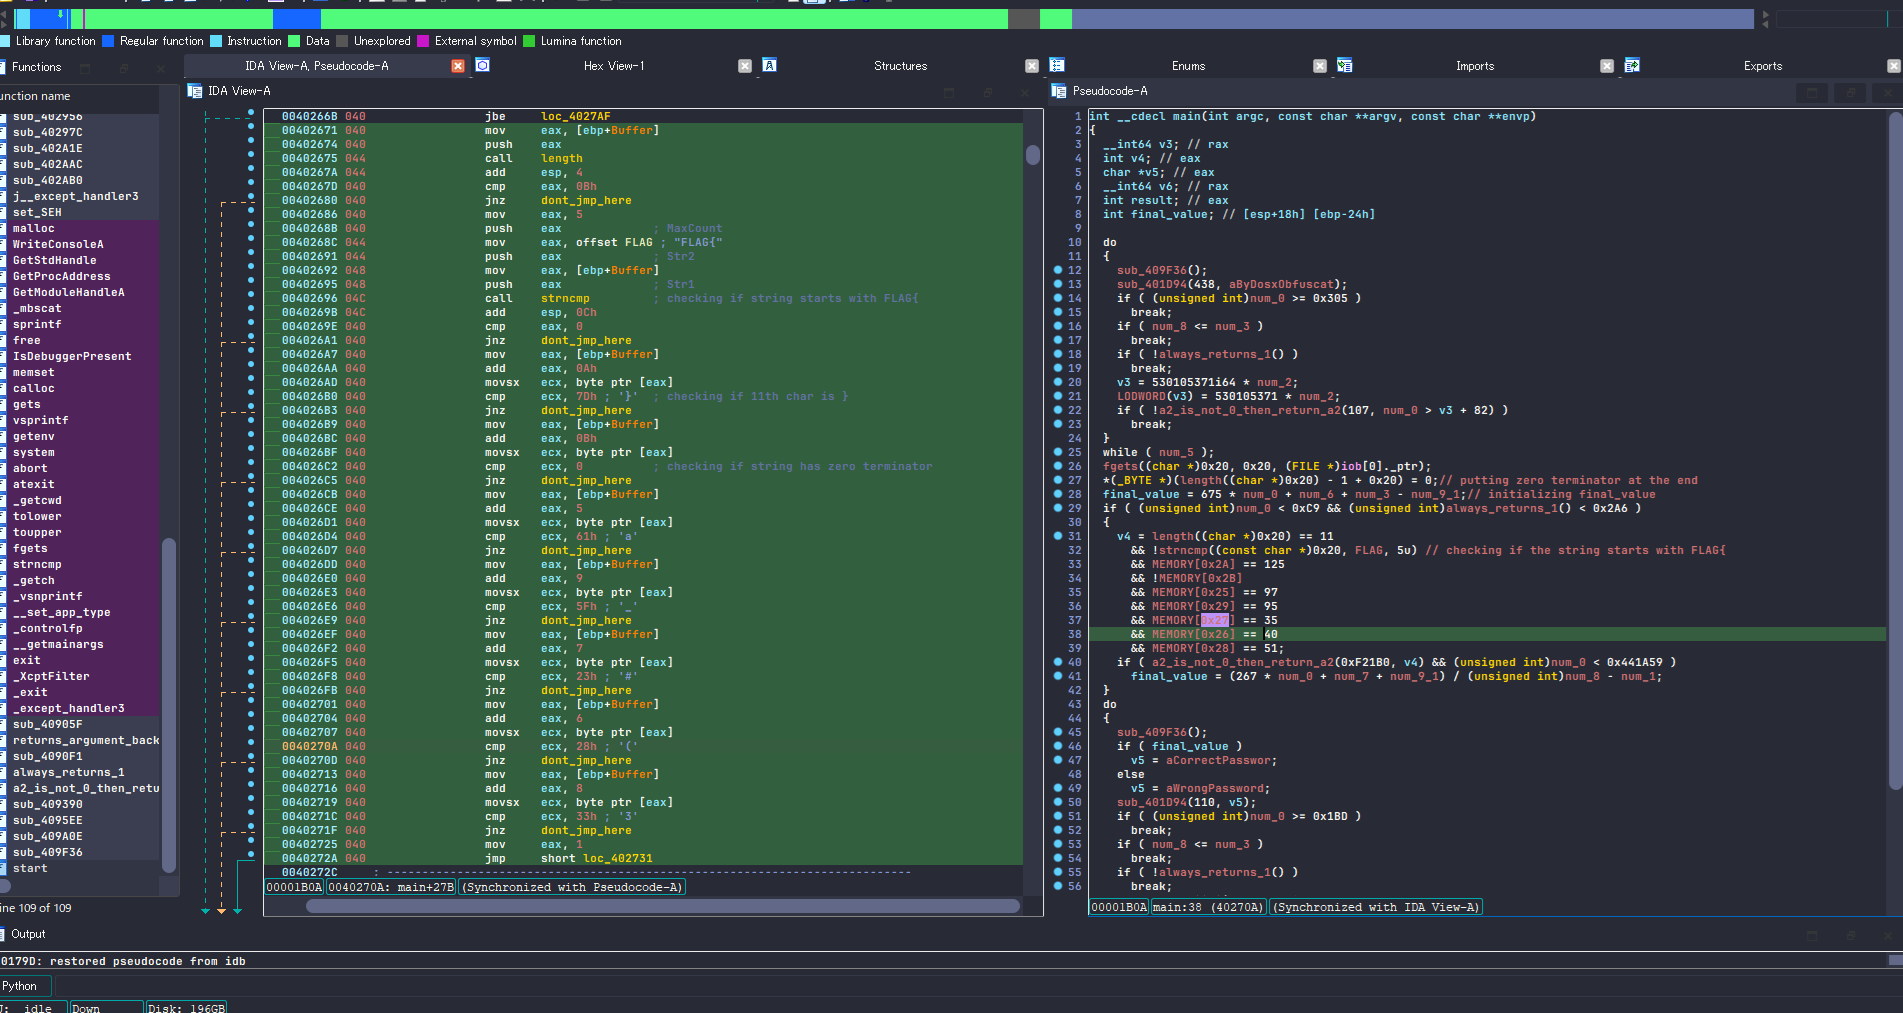 disassembly and pseudocode side by side
Basically it’s
- checking if the buffer length without \0 is 11. (at
0x402672) - checking if the first 5 letters matches to “FLAG{“ (at
0x40269E) - checking if the 11th letter matches to “}” (at
0x4026B0) - checking if the buffer has \0 (at
0x4026C2) - checking if the 6th letter matches to “a” (at
0x4026D4) - checking if the 10th letter matches to “_” (at
0x4026E6) - checking if the 8th letter matches to “#” (at
0x4026F8) - checking if the 7th letter matches to “(“ (at
0x40270A) - checking if the 9th letter matches to “3” (at
0x40271C)
if any of them didnt match, it goes to bad branch.
Congratulation, we’ve found the correct flag ‘FLAG{a(#3_}’.
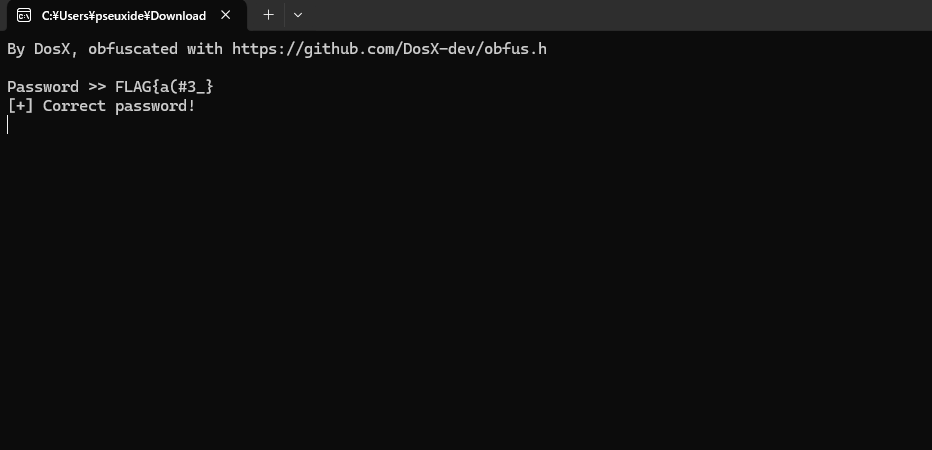 We’ve got a correct password!
Conclusion

The difficulty of the keygenme itself was rudimentary but thanks to that I could focus on fighting obfuscation. That was a very cool challenge!
This time, I intentionally skipped deobfuscating the opaque predicates and junk code insertion. However, if the key verification logic becomes more complicated, I’d need to address it.
Now I take a look at the obfuscator’s github page, surprisingly it even has a virtualization and anti-debugging technique. I’m sure I detoured the anti-debug with ScyllaHide, I saw IsDebuggerPresent call in a few place but never triggered. Virtualization has been a hot topic for this past few years and I’m interested in it so I wanna pull it off one day for sure!
I think I’ll write about solving some other obfuscation techniques for following few posts.